Take Your Notification API and Inbound Parse API Endpoints Serverless with Azure Functions
SocketLabs offers a suite of powerful programming language agnostic APIs, which enable application developers to integrate with the SocketLabs On-Demand platform. Two of our popular APIs are the Notification API and the Inbound Parse API.
When you send mail through SocketLabs On-Demand, notifications can be generated for events such as delivered, complaints, failures, opens and clicks. The Notification API (commonly referred to as a “webhook”) makes it easy to receive these real-time notifications at your own HTTP endpoint.
If you need to programmatically process an inbound mail stream, the SocketLabs Inbound Parse API is your new best friend. Inbound mail for any domain can be received directly by SocketLabs’ powerful email infrastructure. The messages are instantly parsed and passed to your endpoint as JSON messages. This feature makes it easy for applications to process and integrate the content of inbound email messages into things like support systems, discussion forums, and social media applications.
These API’s are very powerful, but since they send data to your application in real-time, they require you to have an HTTP endpoint setup to receive the data. In this article we will show you how to easily setup such an HTTP endpoint without the need to deploy and maintain a server or other infrastructure.
Azure Functions is a solution offered by Microsoft’s Azure platform that allows you to easily create and host simple functions in the cloud. Azure Functions provides a web hook interface that allows you to host your function behind a provided web URL. This functionality makes it easy to quickly set up an endpoint for the SocketLabs Notification API or Inbound Parse API without the need to deploy and maintain a server or other infrastructure. In this tutorial, we’ll guide you through the steps necessary to get started with your own serverless API endpoint.
Prerequisites
Before getting started, you’ll need both a SocketLabs On-Demand account and a Microsoft Azure account. If you don’t have a SocketLabs On-Demand account, you can sign up for your free account here. If you don’t already have a Microsoft Azure account, you can get started with a free trial here. This entire tutorial can be completed on the free tier of both services. While we’ll guide you through all of the necessary steps to get your endpoint up and running, it may be helpful to also take a look at some of the “Get Started” tutorials for a more in depth introduction to Azure Functions. Azure Functions supports many different programming languages that you can use to write your function. For this tutorial, we’ll be using node.js.
Creating the application in Azure
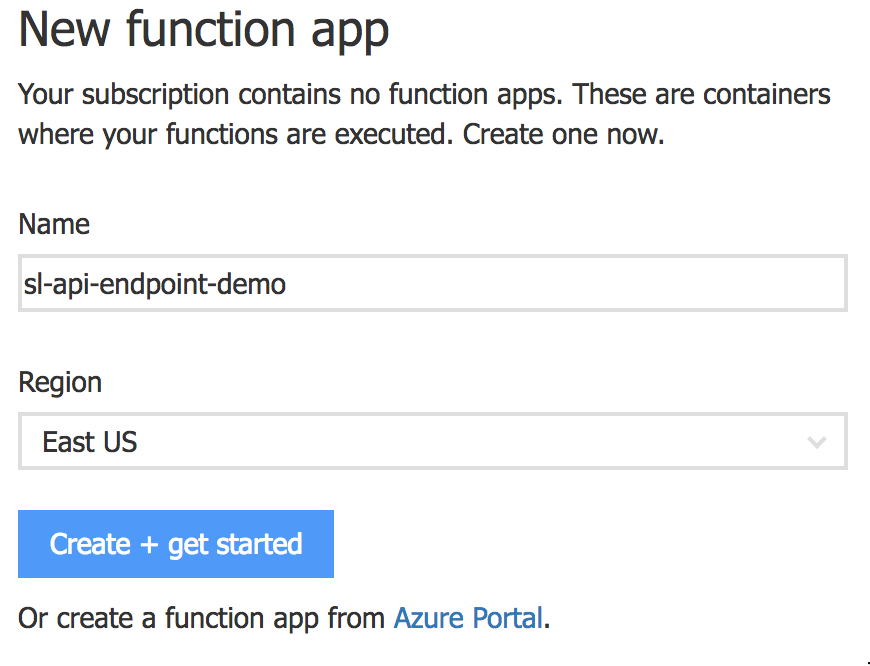
The easiest way to create a new Azure Functions application is directly in the Azure Functions portal. To create your Azure Functions application you’ll need an Azure subscription. Simply give your application a name and choose a region, then click the “Create + get started” button. It takes a few moments to provision your new application, and once this is complete you should be redirected to your new project in the Azure Portal.
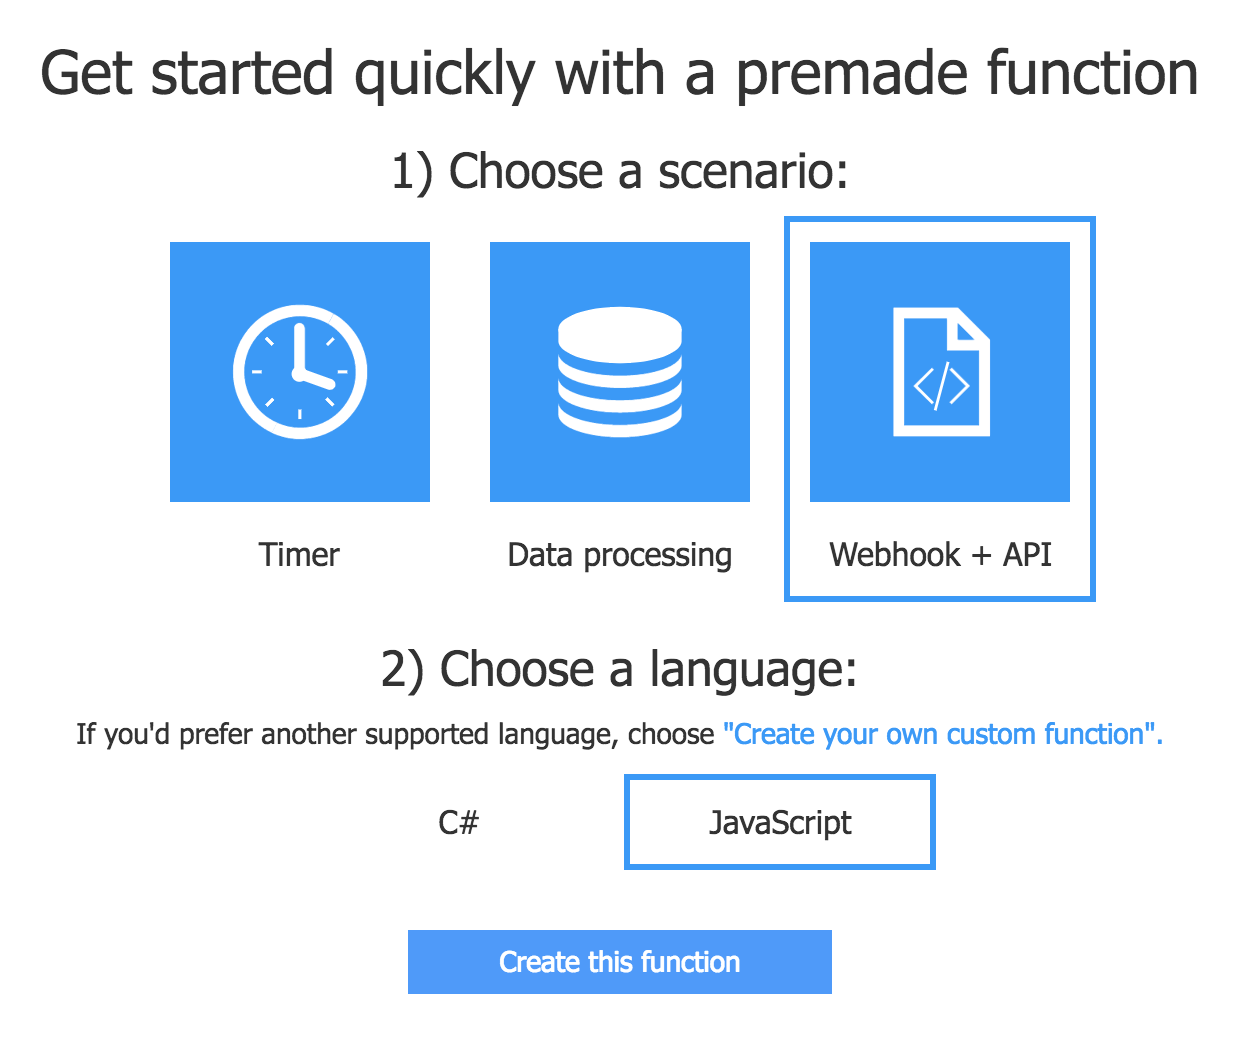
Here you can choose from a few different starter templates and languages, or create a new function from scratch. For this tutorial, choose the “Webhook + API” template and the JavaScript language. Once you’ve selected the desired options, click the “Create this function” button and your function will be created based on the template you chose.
Once the function has been created, you’ll be redirected to the web-based editor for your new function. If this is your first time creating an Azure Function, you may be shown a quick tour of the interface after being redirected.
Obtaining API keys and setting environment variables
For this tutorial we will be setting up an endpoint for the SocketLabs Notification API. However, the steps are very similar for enabling the Inbound Parse API, and the main difference would be minor changes to the code itself to handle the differences in the POST body between the Notification API and the Inbound Parse API.
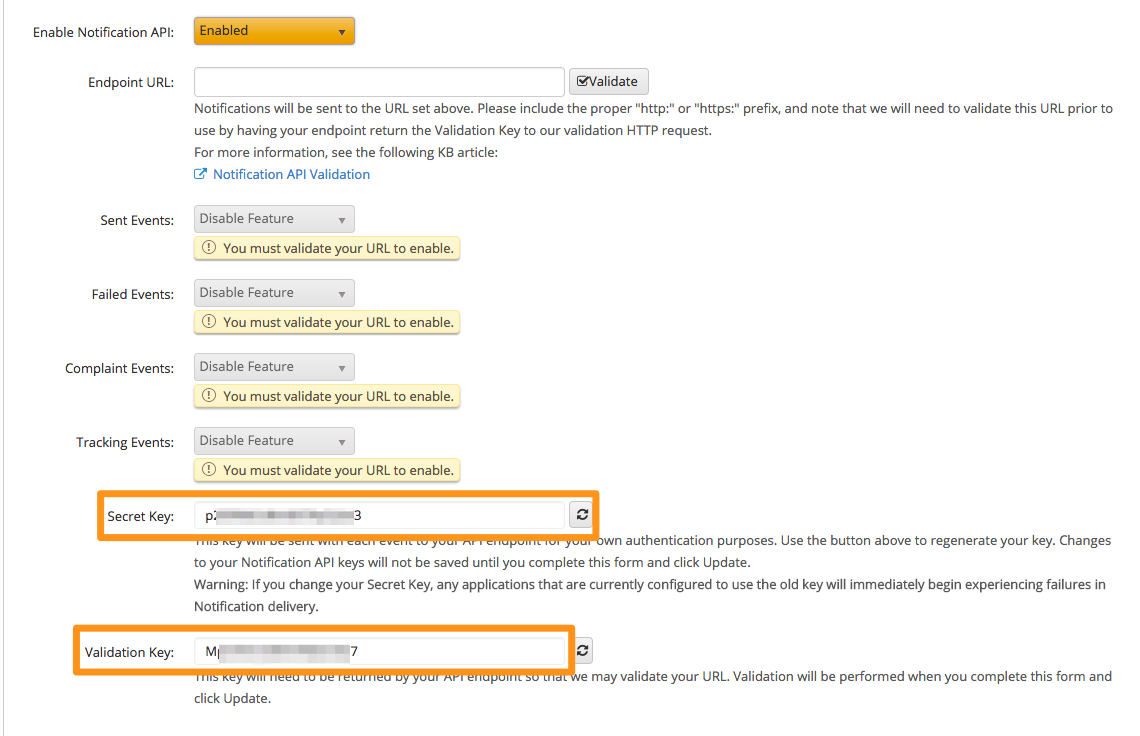
There are two API keys used for the Notification API, the Secret Key and the Validation Key. For more information about how these keys are used, please be sure to check the API Documentation. To retrieve these keys, you will need to log in to the SocketLabs Control Panel. From here, choose the “For Developers” dropdown in the top navigation bar, and select the “Configure Notification API” option. If this is your first time using the Notification API, you will need to enable the feature using the dropdown on this page in order to retrieve your API keys.
Once you retrieve your API keys you’ll want to save them as Environment Variables for use in your Azure Function. Storing the keys as Environment Variables rather than storing them directly in your function’s code adds an additional layer of security, as well as making it easy to change or rotate your keys as needed without making any code changes.
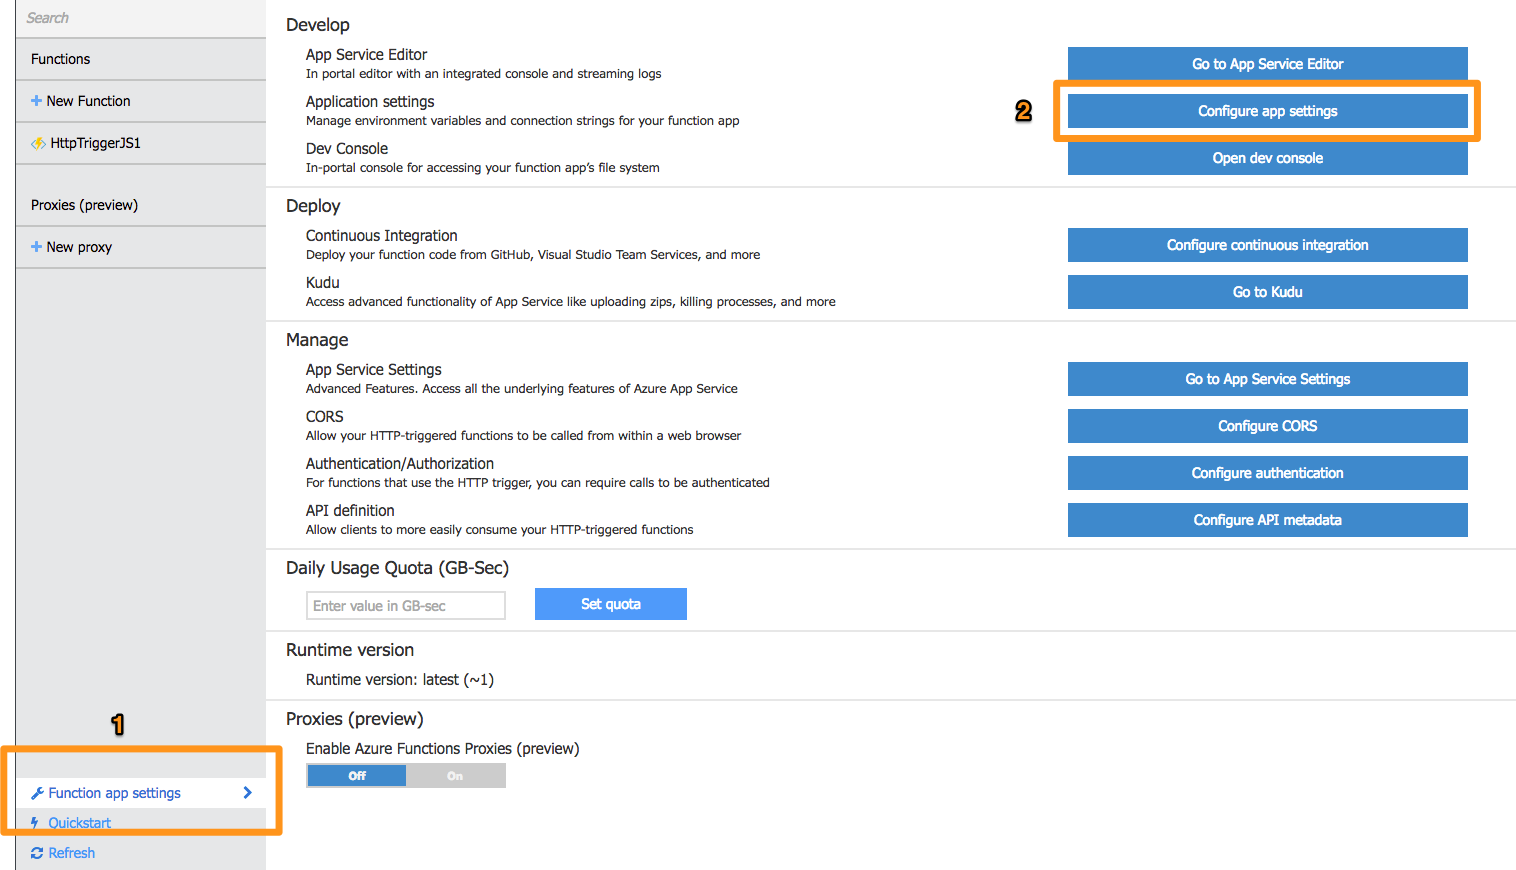
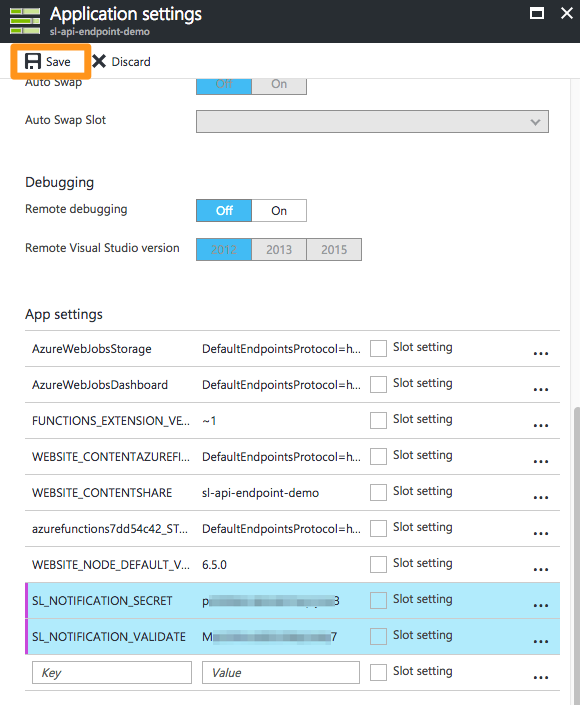
To add the environment variables to your Azure Function application, click on the “Function app settings” button in the lower left navigation bar, and choose the “Configure app settings” option.
In the Application Settings panel, scroll down until you reach the “App settings” section, which contains a list of key/value pairs. This is where you can add your Notification API keys, as well as any other personal information that you may want to use in your function. Once you add your two API keys, be sure to save your application settings. We’ll soon see how to access these variables in your function’s code.
Writing the function code
Now that we’ve retrieved our API keys and set up the environment variables, we are ready to write our function. For this tutorial, we will just be writing a very basic function that will look for the Secret Key, and if it is present we will respond with the Validation Key.
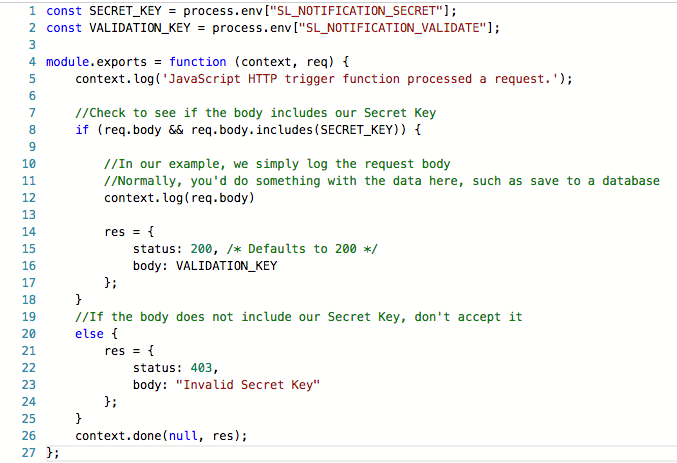
The Webhook template that we used when creating the function gives us a nice starting point, so rather than write our function from scratch we will just modify the function that was provided by the template. First, we will retrieve the variables that we just set up using the node.js process.env method.
const SECRET_KEY = process.env["SL_NOTIFICATION_SECRET"];
const VALIDATION_KEY = process.env["SL_NOTIFICATION_VALIDATE"];
Next, we will modify the query provided by the template to check for the existence of the Secret Key. If the Secret Key exists, we will log the request body and return our Validation Key. If the Secret Key is incorrect or does not exist, we reject the request.
if (req.body && req.body.includes(SECRET_KEY)) {

   //In our example, we simply log the request body
   //Normally, you'd do something with the data here, such as save to a database
     context.log(req.body)

     res = {
       status: 200, /* Defaults to 200 */
       body: VALIDATION_KEY
     };
   }
   //If the body does not include our Secret Key, don't accept it
 else {
   res = {
     status: 403,
     body: "Invalid Secret Key"
  };
}
In your own function you’ll probably do something more useful than logging the request body. Normally you’d parse the body and write it to your database (either within Azure or your own database hosted elsewhere). You can also take the data and pass it to Azure Queue storage, or even make a call to another Azure Function!
Here is our code in full:
Validating your endpoint in the SocketLabs Control Panel
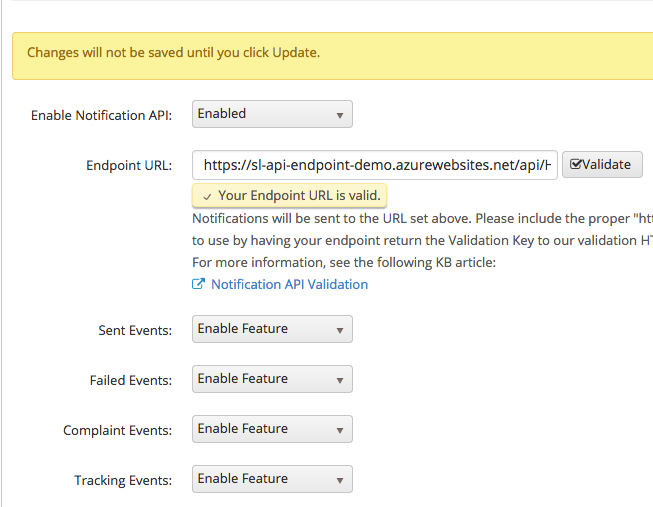
Now that our function code is complete, we can validate our endpoint in the SocketLabs Control Panel and enable the Notification API feature. Make sure you’ve saved your changes in your Azure Function, then click on the “Get function URL” link in the top right-hand corner. Copy this URL to your clipboard, then navigate back over to the Notification API configuration page in the SocketLabs Control Panel.
If you’ve navigated away from this page and haven’t set up the feature yet, you’ll have to toggle the feature to “Enabled” again. Don’t worry, your API keys have not changed. Next, paste your endpoint URL into the box and click the “Validate” button. If everything was configured correctly, your URL should now be validated. Go ahead and enable any events that you’d like to receive notifications for, and then click the “Update” button to save your changes.
You’ll be prompted to enter your password for additional security. Enter your password and confirm that you’d like to enable the feature. At this point, the Notification API feature is enabled and ready to go. If you used the JavaScript code in our tutorial, you can return to the Azure Functions portal and click on the “Monitor” tab on the left hand side to see the logs that were generated when enabling the feature, and for any events that happened after the feature was enabled.
Wrapping it all up
Using the SocketLabs Notification API and Inbound Parse API has never been easier. In just minutes, you can set up a serverless endpoint to enable the API features, and not have to worry about managing infrastructure and deployments for your endpoint applications. If you have any questions about the SocketLabs Notification API, please be sure to check out our API documentation or to submit a request to our expert Technical Support team here.