

SocketLabs offers the ability to send messages through your server using our Injection API. With the Injection API you can use JSON or XML to create a large number of messages and send them to your SocketLabs server over HTTP, rather than SMTP. This allows for some significant flexibility in sending email, especially in cases where common outbound email ports are blocked.
The Injection API also has another great feature which is merge fields. Merge fields allow you to send messages customized to each recipient. Merge fields are also usable with both messages created entirely in the injection request or in conjunction with our marketing tools. In this article, I will detail how these merge fields work and I’ll provide samples in both JSON and XML. For the purposes of testing quickly, I used a tool known as Postman to easily test the API. You can download a copy of Postman yourself here – Get Postman.
Using merge fields with JSON or XML
To use merge fields with messages that are created entirely with the JSON or XML used in the Injection API, you will want to identify the merge fields within the Messages section.
You can Identify the fields in the JSON with %% surrounding the field and then create the matching Field:Value pair in PerMessage for each recipient or in GlobalMessage. The field will be the one identified with the %% syntax, and the value will be what you want displayed to the recipient. The value also needs to be a string, so any other value type will generate an error.
You can also use HTML in the merge fields to further customize messages for your recipients. Be careful though, as you will need to properly escape the HTML for our parser to recognize the JSON and not return an error.
{
    "ServerId": "Your server number here",
    "ApiKey": "Your API key here",
    "Messages": [{
        "MailingId": "%%MailingId%%",
        "MessageId": "%%MessageId%%",
        "MergeData": {
            "PerMessage": [[{
                "Field": "DeliveryAddress",
                "Value": "[email protected]"
            },
            {
                "Field": "RecipientName",
                "Value": "Test1"
            },
            {
                "Field": "SeniorEmployeeName",
                "Value": "Test Employee1"
            },
            {
                "Field":"HTML",
                "Value":"</!DOCTYPE html>\n\n<html>\n  \n  <head>\n    \n    <title>Testing: \"Hello World\"</title>\n  \n  </head>\n  \n  <body>\n    \n    <h1>Hello World!</h1>\n    \n    <p>This is a test whether or not this will break the json; it requires both \"quotations\" and :colons:</p>\n  \n  </body>\n\n</html>"
            },
            {
                "Field": "MessageId",
                "Value": "Test Message 1"
            }],
	[{
                "Field": "DeliveryAddress",
                "Value": “[email protected]"
            },
            {
                "Field": "RecipientName",
                "Value": "Test2"
            },
            {
                "Field": "SeniorEmployeeName",
                "Value": "Test Employee 2"
            },
            {
            	"Field":"HTML",
            	"Value":"</!DOCTYPE html>\n\n<html>\n  \n  <head>\n    \n    <title>Testing: \"Hello World\"</title>\n  \n  </head>\n  \n  <body>\n    \n    <h1>Hello World!</h1>\n    \n    <p>This is a test whether or not this will break the json; it requires both \"quotations\" and :colons:</p>\n  \n  </body>\n\n</html>"
            },
            {
                "Field": "MessageId",
                "Value": "Test Message 2"
            }]
            ],
            "Global": [{
                "Field": "MailingId",
                "Value": "HR-018"
            }]
        },
        "Subject": "Employee mentorship program information.",
        "TextBody": "%%RecipientName%%, you have been paired with
                     %%SeniorEmployeeName%% as part of our mentorship program!  This is a test of the Text Only portion",
        "HtmlBody": "%%HTML%%",
        "CustomHeaders": null,
        "To": [{
            "EmailAddress": "%%DeliveryAddress%%",
            "FriendlyName": "%%RecipientName%%"
        }],
        "Cc": null,
        "Bcc": null,
        "From": {
            "EmailAddress": "[email protected]",
            "FriendlyName": "Test Department"
        }
    }]
}
This example sends two messages between two different test addresses. It highlights how you can use merge fields in the delivery address, select portions of the text content of the message and even the entirety of the HTML portion of the message. Merge fields are a versatile tool for constructing general messages personalized for recipients individually.
Similarly to the text portion in the above example, merge fields can be used within HTML without taking up the entirety of the HTML portion. With merge fields, you can create a unique message for each recipient, or modify the general message with unique parts for a recipient.
Although not shown in the above examples, you can also set merge fields to hold unique image URLs so that each recipient can receive a personalized image. Once we build the message in our platform, it will automatically insert the image URL that you defined for that recipient.
How to use merge fields with XML
With XML, the process will be slightly different than with JSON. The syntax for identifying the fields is the same, surround the field with %%. However, when creating the field:value pair, each set needs to be in a MergeRow, and each recipient has its own <ArrayOfMergeRow>. And as before with the JSON, you will need to properly escape any HTML you are using as merge data. Failure to properly escape the characters will result in a failure code returned from the API.
<PostBody>
<ApiKey>Your API Key</ApiKey>
<ServerId>Your Server ID</ServerId>
<Messages>
<EmailMessage>
<To>
<Address>
<EmailAddress>%%DeliveryAddress%%</EmailAddress>
<FriendlyName>%%FriendlyName%%</FriendlyName>
</Address>
</To>
<From>
<EmailAddress>[email protected]</EmailAddress>
<FriendlyName>test</FriendlyName>
</From>
<Subject>test</Subject>
<TextBody>String</TextBody>
<HtmlBody>%%HTML%%</HtmlBody>
<MergeData>
<PerMessage>
<ArrayOfMergeRow>
<MergeRow>
<Field>DeliveryAddress</Field>
<Value>[email protected]</Value>
</MergeRow>
<MergeRow>
<Field>FriendlyName</Field>
<Value>K</Value>
</MergeRow>
<MergeRow>
<Field>HTML</Field>
<Value></!DOCTYPE html><html><head><title>Testing: "Hello World"</title></head><body><h1>Hello World!</h1><p>This is a test whether or not this will break the XML; it requires several characters reserved in XML, such as pointy brackets<> | and backslashes //.</p></body></html></Value>
</MergeRow>
</ArrayOfMergeRow>
<ArrayOfMergeRow>
<MergeRow>
<Field>DeliveryAddress</Field>
<Value>[email protected]/Value>
</MergeRow>
<MergeRow>
<Field>FriendlyName</Field>
<Value>KM</Value>
</MergeRow>
<MergeRow>
<Field>HTML</Field>
<Value></!DOCTYPE html><html><head><title>Testing: "Hello World"</title></head><body><h1>Hello World!</h1><p>This is a test whether or not this will break the json; it requires both "quotations" and :colons:</p></body></html></Value>
</MergeRow>
</ArrayOfMergeRow>
</PerMessage>
</MergeData>
</EmailMessage>
</Messages>
</PostBody>
Merge fields with API Templates
API templates make this process a little easier. With API templates, you can create your content using our email designer and reference that template in the JSON or XML. The merge fields in the content are delimited with ##, i.e. ##Field##. For the JSON or XML in the PerMessage section, simply have a field-value pair for each custom field that you want to use in the template. You will still need to identify the recipients in the manner shown above.
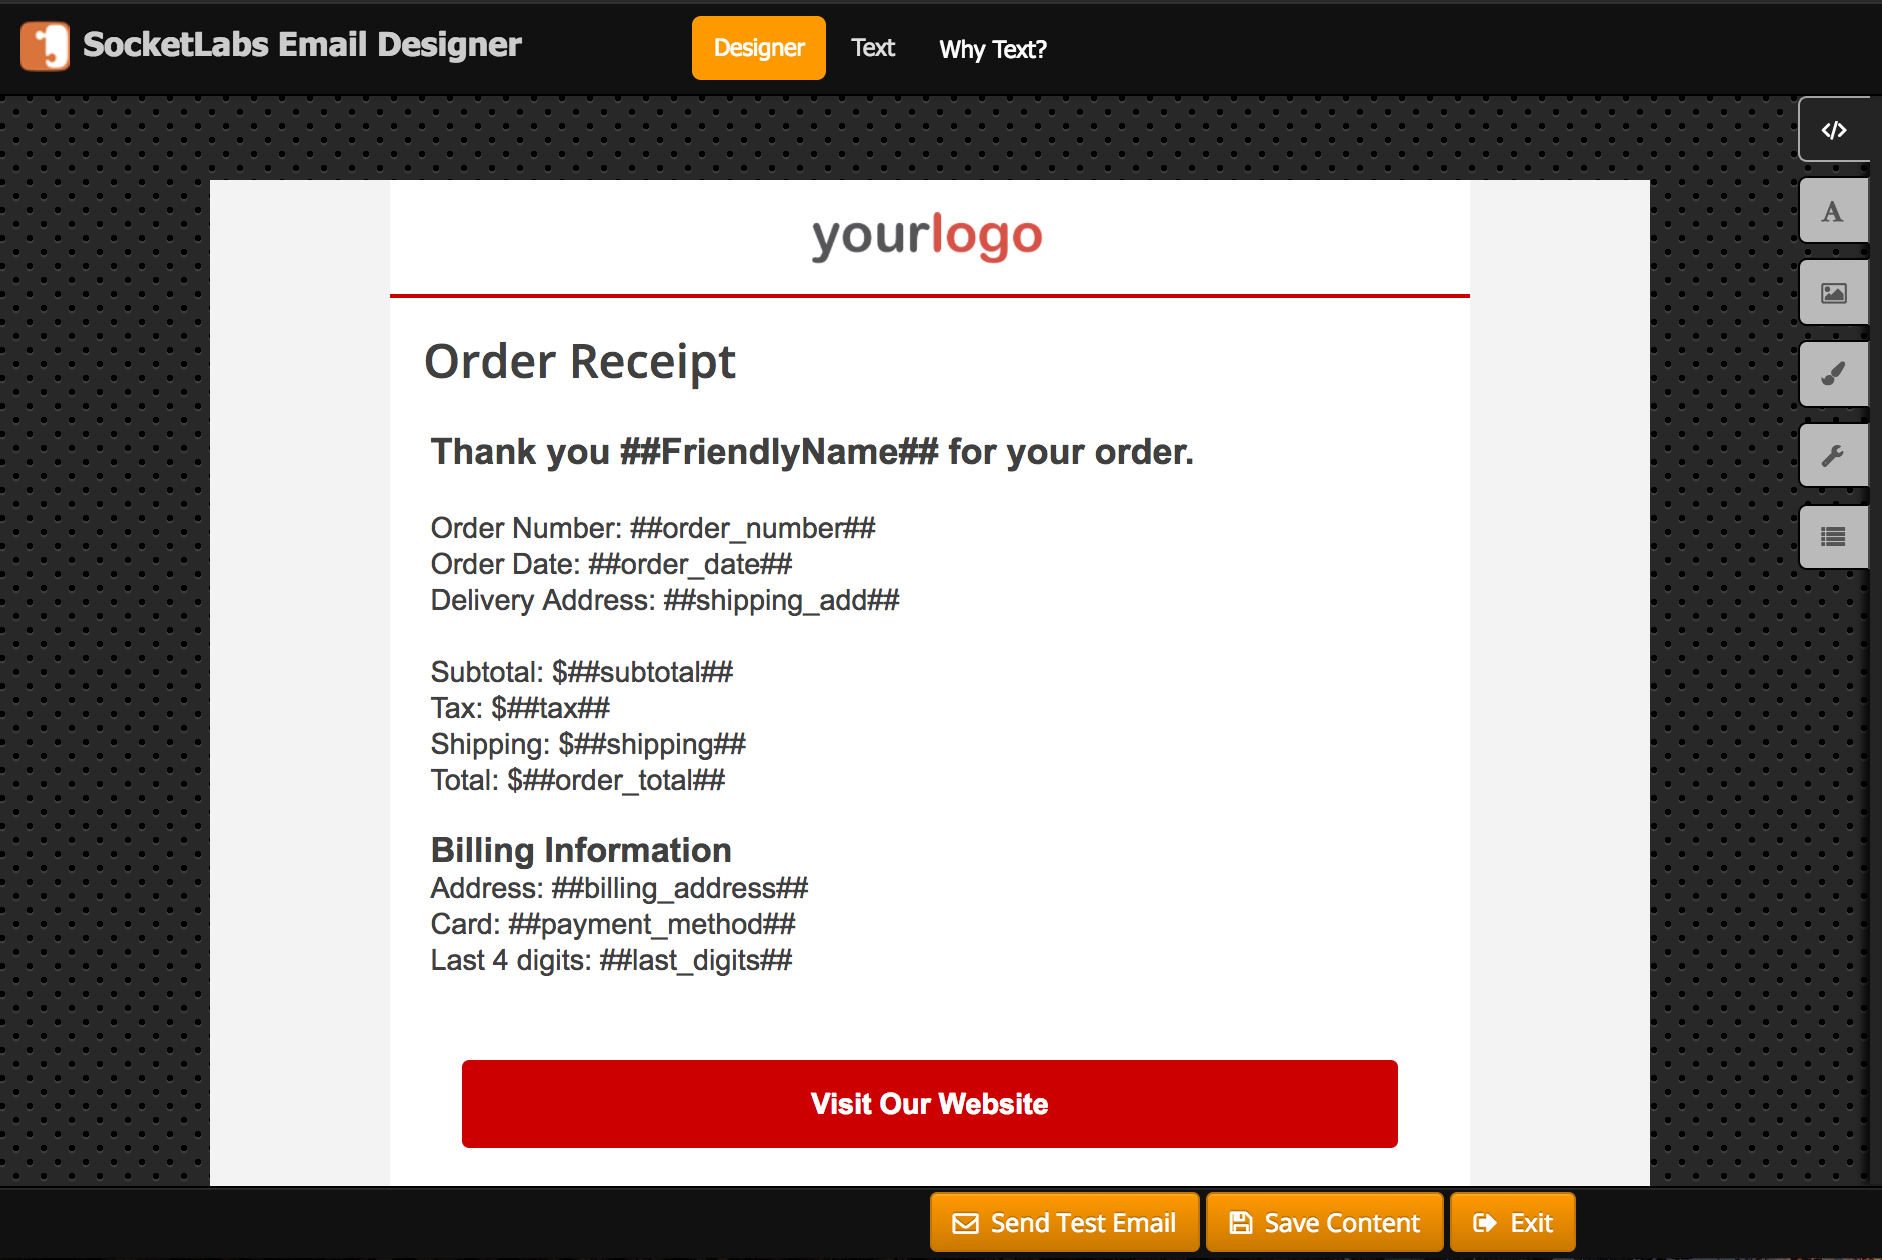
Below we have a screenshot of an email created in our email designer. It’s very basic and designed to only show the basic functionality of the API Templates and merge fields feature.
In this template, we have numerous merge field noted with ## syntax. These are the merge fields that will be identified in the injection request JSON or XML. The JSON example below has the fields properly identified with corresponding values. One of the big differences you’ll notice between this injection request and the previous ones from above, is that we only need to refer to the ID of the template we are merging to, instead of specifying the email content inline. You won’t need to identify any fields in the content of the message using the %% syntax with the exception of the delivery address and friendly name. Those still need to be identified with the %% syntax in the request JSON or XML.
Example JSON
{
   "ApiKey":"Your API Key",
   "ServerId":"Your ServerID",
   "Messages":[
      {
         "ApiTemplate":"1",
         "To":[
            {
               "EmailAddress":"%%DeliveryAddress%%",
               "FriendlyName":"%%FriendlyName%%"
            }
         ],
         "From":{
            "EmailAddress":"[email protected]",
            "FriendlyName":"Company Name"
         },
         "Subject":"Thank you for your order.",
         "MergeData":{
            "PerMessage":[
               [
                  {
                     "Field":"DeliveryAddress",
                     "Value":"[email protected]"
                  },
                  {
                     "Field":"FriendlyName",
                     "Value":"Keith"
                  },
                  {
                     "Field":"order_number",
                     "Value":"123"
                  },
                  {
                     "Field":"order_date",
                     "Value":"01/01/2017"
                  },
                  {
                     "Field":"shipping_add",
                     "Value":"700 Turner Industrial Way Suite 100 Aston PA 19014"
                  },
                  {
                     "Field":"subtotal",
                     "Value":"10.50"
                  },
                  {
                     "Field":"tax",
                     "Value":"1.64"
                  },
                  {
                     "Field":"shipping",
                     "Value":"0"
                  },
                  {
                     "Field":"order_total",
                     "Value":"12.14"
                  },
                  {
                     "Field":"billing_address",
                     "Value":"700 Turner Industrial Way Suite 100 Aston PA 19014"
                  },
                  {
                     "Field":"payment_method",
                     "Value":"Visa"
                  },
                  {
                     "Field":"last_digits",
                     "Value":"1234"
                  }
               ]
            ]
         }
      }
   ]
}
After the above injection request processes successfully a message will be delivered that looks like this:

The use of our merge fields, especially in conjunction with the newly released and improved custom fields, will allow you to create dynamic content for a large number of recipients from a single API call. This is a time-saving process that can lead to better results and more efficient throughput of message delivery.
What to Do Next — Try it Yourself
If you’re currently a SocketLabs user with an active server, then you can get started with merge fields right away.
If you’re interested in using merge fields to create dynamic and personalized content, but you are not a SocketLabs user, then click here to get started with a free account.